How to Convert Generator to Gas – we are happy to bring the trading new step-by-step how Convert Generator to Gas stay focused here and see full

How to Convert Generator to Gas
They are reasons why you can determine to switch from the traditional petrol to gas generator. It’s possible that you just need to clean the burning engine. It’s possible that you just don’t want to store a large quantity of liquid fuel around the house. At the same time, liquid fuel can become bad while gas will always stay good no matter what.

During any catastrophe, getting liquid fuel to make your generator work might be a problem. At the same time, you will need to get some money to make your generator work out of propane. You may need up to N 10,000 $10 to do that!
Step 1: Warnings

Do not forget that it can be quite dangerous if the generator dies and you are not around to fix the problem. Therefore, you may have a nice explosion. At the same time, the kits that you buy on the commercial markets have the safety measures that will shut the gas off if it’s necessary. Therefore, it will not flood the area with propane.
It’s better to run your generator outside or on the driveway. Therefore, you will need to make some precautious measures before you start running this generator.
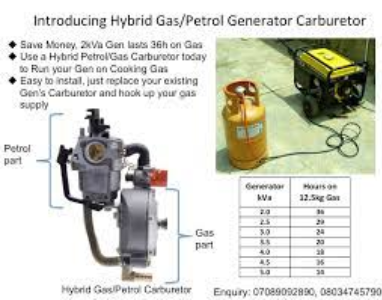
Step 2: Carburetor

You will need to use a new carburetor for the purpose of “how to convert petrol generator to gas.” Do not forget that once you use a new carburetor – it can’t be used for anything else. Therefore, it’s advisable to use old carburetors for this task.
The reason to use the old generator can be explained by three simple reasons. The very first reason is you will have two carburetors, one of which is used for petrol and the second one for gas. If you screw up the old generator, you will always switch to the new one. The last reason is that you can always switch to petrol.
Step 3: Remove the old Needle Valve and Old Float
Take your carburetor and remove the bowl. It can be done by unscrewing the bottom of the bowl. After that, you will need to remove the spring and needle valve. In most carbs, these two components come out together with no problem.
Step 4: Remove the Butterfly
You will need to remove the butterfly valve. You can do it by removing the little screw on the valve plate itself.
Step 5: Remove Mixture Screws and Idle
You just need to remove the mixture screws jets and the idle. It will need to use a new needle. It will control the RPM of the motor.
Step 6: Remove the Jet Hole Plate Cover
You will need to drill a hole in the cover. Be careful when you drill through the carb. Just drill through the small aluminum cover.
Step 7: Primer Bulb Removal
You just need to pull on the bulb real good, and it will pop right off. It can be a small retaining ring to be pried out before the removal of the bulb. Sometimes, it can also pop from the basis if it’s a little bit rusty.
Step 8: Venturi Jet Removal
It’s also needed to remove the venturi jet. You just need to install the screw in the bottom and then just pull. The assembled jet will eventually pop up. It will be easier for further drilling.
Step 9: Clean it up
You will need to clean the whole carb up. It’s possible to do if you use the Dremel tool. It’s also possible to use the carb cleaner for this purpose.
Step 10: Drill the Venturi port
You will need to drill the old venturi port. It will serve as the port for the tube that you will install later. Be sure that you drill straight. At the same time, you will need to remove all metal shavings from the carb. Use the chemical cleaner for this task.
Step 11: Seal everything up
Seal up the holes and jets. It’s needed to use the black ATV silicone. It’s resistant to heat and seals the holes for good. It’s also necessary to seal the primal bulb hole. The vacuum control hole can be sealed as well.
Step 12: New Venturi Tube Parts
You will need a regulator for this task. It’s possible to take this regulator from any BBQ grill. Reduce the connection in the regulator up to 6-7 millimeters. This valve is to be used to adjust the gas flow. You will also need tubes around 15 centimeters in length and 6-7 millimeters in diameter.
Step 13: New Venturi tubes
You will need to use 7-8 centimeters of 6-7 millimeters copper tubing for the new venture tube. It’s better to deburr it after cutting. Just try to ridge inside and outside the tube.
You will need to assemble the whole construction. For this reason, it’s better to use the Teflon tape. You will also need to use another piece of 7 millimeters tube.
Step 15: Put everything together
You will need to assemble the whole construction into one carb. When you assemble everything, it needs to get tested before running.
Step 16: Final Assembly
You will need to mount the whole carb into the motor of your generator. Just be sure to use a gasket between the carb. At the same time, you will need to cope with the manifold. When you have connected the gas regulator line, you can connect the gas tank to your construction. You will need to adjust the needle valve for the best running speed of the energy.
Conclusion
If you need a video on How to Convert Generator to Gas drop comments will send to you
Leave a Reply